How to Wrap Text in Google Slides (Easiest Way in 2024)
In this article, we will show you how to wrap text in Google Slides. Simply follow the steps below.
Wrap Text in Google Slides
In order to wrap text in Google Slides, simply follow the steps below.
1. Select and Move the Text Box
In our example, we have a slide titled ‘The Future of Solar Power.’ You want to wrap the description within the slide to enhance both its visual appeal and readability.
Click on the text box that contains the description of solar power advancements. Once selected, you can move the text box by clicking and dragging it to a new position around the image where it will be most visible and aesthetically pleasing. In our case, let’s place the text box to the right of the picture.

2. Resize the Text Box to Fit the Space
After moving the text box to a suitable position near the image, adjust its size to fit the available space. Click on any of the handles on the corners or edges of the text box and drag to resize. Ensure the text comfortably fits within the space without overlapping the image or extending the slide.

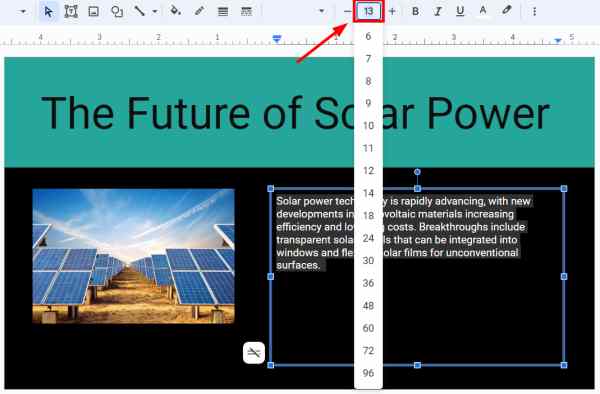
3. Adjust Text Formatting for Clarity
With the text box selected, modify the font size, line spacing, and alignment using the options in the toolbar. This helps in making the text clear and readable.

In our case, let’s set the font size of the text in this box to 20 to ensure readability.
4. Arrange the Image for a Better Layout
If the image needs repositioning to better accommodate the text or improve the overall layout, click on the image and drag it to a new location. Adjust its size by dragging its handles if needed to ensure it complements the text without overshadowing it.

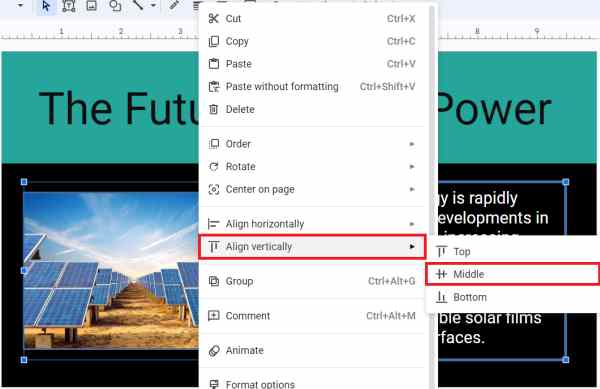
5. Fine-Tune Text and Image Alignment
To ensure a visually balanced alignment between the text and the image, select both by holding the Shift key and clicking on each. Then, right-click on one of the selected items to open the context menu. Look for the ‘Align vertically’ option, then select ‘Middle’ from the subsequent options.
6. Review and Make Final Adjustments
Preview the slide to see how both the text and image appear together. Make any final adjustments to the positions, sizes, or formatting of text to ensure that the slide is visually cohesive and the information is easy to absorb.

How to Wrap Text Around a Picture
To wrap text around a picture, we will work with the same slide from our previous example titled ‘The Future of Solar Power.’
1. Assess the Current Layout
Examine the slide with the existing image and text. Identify the portion of the text that would best complement the image.
In our case, we will break the text into two parts. The first sentence will be placed to the right of the image, and the second sentence will be placed below the image.

2. Select and Modify the Existing Text Box
Click on the text box that contains all the text. You may need to cut the text that you want to place below the image. Press `Ctrl+X` to remove the selected text temporarily.

3. Create a New Text Box for the Bottom Text
Click the ‘Text box’ icon in the toolbar and draw a new text box below the image. Paste the text you cut earlier into this new text box by right-clicking and selecting “Paste” or pressing `Ctrl+V` (Cmd+V on Mac).

4. Adjust the First Text Box (Right of the Image)
Now, adjust the original text box to align it to the right of the image. Resize the text box by dragging its handles so that it fits the space available to the right of the image, ensuring it does not overlap the image.

5. Format the Text in Both Boxes
Ensure the text in both boxes is formatted consistently. Select each text box and use the toolbar options to set the font size, style, and line spacing. This uniformity in text formatting will help maintain a cohesive look across the slide.

6. Final Adjustments for Aesthetic Layout
Review the layout to ensure that the text is neatly arranged and the overall appearance is visually balanced. Make any final adjustments to the positioning of the text boxes or the formatting of the text to enhance the clarity and impact of your slide.

We hope that you now have a better understanding of how to wrap text in Google Slides. If you enjoyed this article, you might also like our article on how to fix a video that cannot be loaded in Google Slides or our article on how to delete a text box in Google Slides.